K.I.S.S Lesson - Let's Begin with a Calendar
First of all let's get this straight: Web 2.0 technologies will never ever replace a handshake, a smile and a business card. There is a simple reason for this: to paraphrase the famous Philosopher, Daniel Dennett, no matter how wonderful our communication techs get, the technology of evolution is smarter than we are. We communicate through our bodies and as much as I like distance communication, I will always choose the hug of a friend and the hand clap of my associates.
The reason I mention this is that I mentioned that I was making a Google Calendar for a group and he said, "We'll, if they get this then they may not come to our meetings." I should note, this is a meeting about "networking" and the need to actually meet people is stressed, so physical communication is key. Still, I was upset. Not because he was wrong. He wasn't. But I think I was upset because this online tool is as much a communication tool as pencil and paper, which are also man made communication technologies. By the way, so are the modern Alphabet and Arabic numerals. These are all technologies and they all help us convey ideas and network with each other.
The beauty of Web 2.0 techs, like Google Calendar is it allows you to make portions of your life much more visible to whomever you wish to have in your community. This transparency allows groups to make better decisions and its members can better decide the value of your goods and services.
By the way, if you are in a service industry of any kind, I cannot state how important it is to consider making a Google Calendar for your business or community. Here's how you go about doing it.
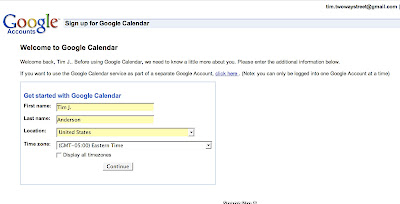
1) First, if you do not have a Google Account, go get one. They are free and Google is the best, most effective place to begin. Once you get one then it will allow you to get a number of services. Some of these are fairly easy to figure out (i.e. Gmail,Talk, etc.) but others are not as simple. Don't worry. Get your account and click on Calendar. It will bring you to a page that looks like something like the image below where you will confirm your name, location and time zone...
2) After you finish your confirmation you will get a blank calendar that looks like the image below...
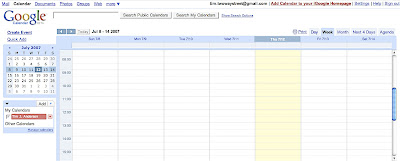
The calendar will have "day", "week", "month", "next 4 days" and "agenda" options. For this exercise make certain you click on the week option.
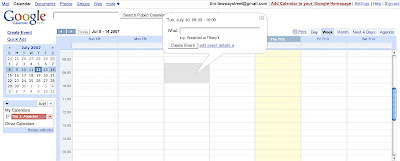
3) Now you are ready to go and this is where the fun begins. Just take your mouse and find a calendar period you would like to work with. Left click your mouse and drag. You will see it shade the period and when you release a bubble will appear that points to the shaded area. It looks like the image below. At this point in time you can, if you want, simply write what you want in the "what" space that is ready for text and click "Create Event", which is in the bubble, and you will have created an event. However, we want to click on the blue text, "edit event details".
4) After you click on "edit event details", your page will change and look like the image below.
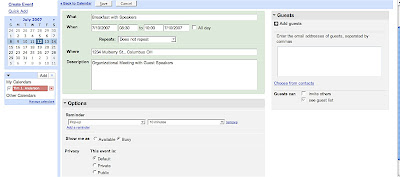
There are a number of spaces here to fill in the details and you should take advantage of them, particularly everything in the green section of the page. The text you place here will be vital for your patrons to find the event, understand what you are doing and, well, simply plan for it. After you fill out the green portion of the page, go immediately below to the gray section that is headlined as "options". This is a space where you can set a reminder for yourself, which will be sent to your email at a time you designate, and it is a place to make your event private or public. What's the difference? Well, this is what Google says...
So it's up to you and depending on your objectives you will need to decide.
Using the "Privacy" option, you can control the visibility of individual events on your calendar. If you share a calendar with someone, that person will see all your events by default. To make a particular event private (so that only you and other calendar owners can see it), just click on "Private." If your calendar isn't currently shared, but you'd like to make a single event public (so that anyone in the world can see it), just click on "Public."
Finally, if you look to the right hand side of the quote, you will see a space where you can directly invite guests. This is a convenient space to invite a few people, but it could be cumbersome to invite everyone one by one. You may wish to enter a guest list, which is something that can be developed in multiple manners. More on that last point later. Now, you are ready to save your event. Click on the "save" button on the top of the page.
5) Great, now you should have an event that looks like this...

6) Ok, you are not quite done. Now you need to define your calendar. You can have many calendars and subscribe to many more. For example, I have four calendars, one for my business, one for my exercise, one for my personal events and one for my medical events. Also, I subscribe to my lovely fiance's calendar so that I know what I will really be doing, a calendar for my dad, a calendar for my favorite sports teams and one for major US Holidays. These are a variety of different types of calendars, some private and some public. The great thing is you don't have to look at all of them at once. You can. But if you are like me you just get confused. One of the things that will help you clarify your situation is you can assign any color you wish to your calendars. How do you do that? Well, you go to the left hand side of the page and you look at "My Calendars". Next to your calendar will be a small button of similar color that has an arrow that points down. Click on it. Once you do this you will see something that looks like this...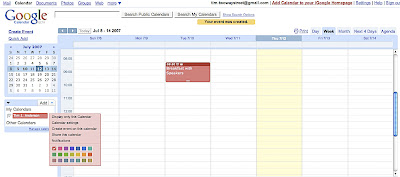
You can choose another color, but I want you to click on "Calendar settings". Once you do this you will see another page that looks like this...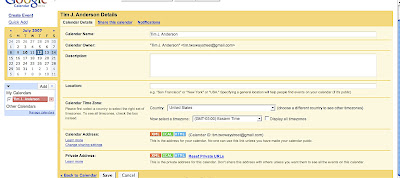
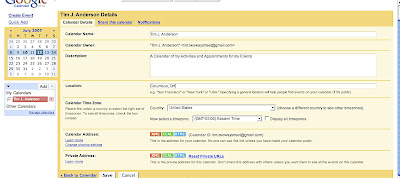
Now, here you can name your calendar, put in a general description of what the calendar is (i.e. "a calendar of local beanie baby events", etc.), a location that it is centered around (i.e. the Columbus OH Metro Area). Fill it out and it will look something like this...
. Start making your calendars and sharing them with fiends. And if you want them downloaded onto iCal and Outlook programs, you can do that too... in fact you can publish your calendar in an HTML format. All of these options are on the same page and if you wish to play around with these you can. Also, Google can help you with these in the help section of it's Google Calendar service. But you have done a lot, I suggest you click on the "save" button on the lower left-hand portion of the page and begin to fill in your calendar. Don't be shy and remember, you can't break it and you can always edit and fix your mistakes. And remember, this doesn't replace the handshake.
Powered by ScribeFire.
No comments:
Post a Comment